先介绍系统的部署。Easy Testing 的服务端与教师客户端是打包在一起的, 这打包文件和学生客户端打包文件一起在 GitHub Releases 发布。 根据操作系统、CPU 架构选择需要的版本下载即可。
首先要安装 MySQL 数据库,建议版本 5.7。 安装步骤参考官网文档。
然后将前面下载的压缩包解压至任意位置,其中包括:
├── EasyTesting          服务端主程序
├── server-config.yaml   服务端主程序的配置文件
├── favicon.ico          软件图标
├── index.html           教师端主页面
├── README.md            使用须知
├── LICENSE              软件开源许可证
├── sql                  MySQL 脚本
│   ├── setup.sql        创建数据库的脚本
│   └── test.sql         插入测试数据的脚本
└── static               教师端主页面的静态文件
    ├── css              样式文件
    │   ├── app.4c2aef82.css
    │   ├── chunk-019156c7.a8088982.css
    │   ├── chunk-07c1fcd4.04dea0eb.css
    │   └── ...
    ├── fonts            字体文件
    │   ├── element-icons.535877f5.woff
    │   └── element-icons.732389de.ttf
    ├── img              图片
    │   ├── 404.a57b6f31.png
    │   ├── 404_cloud.0f4bc32b.png
    │   ├── avatar.ecba1844.gif
    │   └── ...
    └── js  javascript  脚本文件
        ├── app.82de0e6e.js
        ├── app.9d60ec40.js
        ├── chunk-019156c7.b0ca593f.js
        └── ...
其中 static 文件夹是前端自动打包的,内部文件名与文件数未必与上面的一致。
server-config.yaml 是关键的配置文件,内部的属性都有注释,
如果仅用于测试,仅需修改数据库 dsn 的用户名与密码(即替换掉 root:12345)。
记得设置好文件权限:
$ sudo chmod -R 644 your_path_to_folder/easy_testing
$ sudo chmod 755 your_path_to_folder/easy_testing/EasyTesting
接下来执行数据库脚本 setup.sql,参考官网文档进行。 如果需要测试数据,还可接着执行 test.sql。
正式使用时的操作
正式使用时,务必不要使用默认的数据库用户名与密码,并且要将 server-config.yaml 中的 jwt_secret_key 改成其他的随机字符。 仅需执行数据库脚本 setup.sql,脚本最后会插入一个 root 用户,工号为 0,密码为 ET000,用它进入系统后即可修改自己身份信息。
最后进入文件夹根目录启动服务端主程序(因为程序会在当前工作目录下查找配置文件),
$ cd your_path_to_folder/easy_testing
$ ./EasyTesting
正常启动后终端会出现日志,类似于:
[GIN-debug] [WARNING] Running in "debug" mode. Switch to "release" mode in production.
 - using env:   export GIN_MODE=release
 - using code:  gin.SetMode(gin.ReleaseMode)

[GIN-debug] GET    /teacher_auth             --> github.com/appleboy/gin-jwt/v2.(*GinJWTMiddleware).LoginHandler-fm (5 handlers)
[GIN-debug] GET    /student_auth             --> github.com/appleboy/gin-jwt/v2.(*GinJWTMiddleware).LoginHandler-fm (5 handlers)
[GIN-debug] GET    /                         --> github.com/gin-gonic/gin.(*RouterGroup).StaticFile.func1 (5 handlers)
[GIN-debug] HEAD   /                         --> github.com/gin-gonic/gin.(*RouterGroup).StaticFile.func1 (5 handlers)
[GIN-debug] GET    /favicon.ico              --> github.com/gin-gonic/gin.(*RouterGroup).StaticFile.func1 (5 handlers)
[GIN-debug] HEAD   /favicon.ico              --> github.com/gin-gonic/gin.(*RouterGroup).StaticFile.func1 (5 handlers)
[GIN-debug] GET    /static/*filepath         --> github.com/gin-gonic/gin.(*RouterGroup).createStaticHandler.func1 (5 handlers)
[GIN-debug] HEAD   /static/*filepath         --> github.com/gin-gonic/gin.(*RouterGroup).createStaticHandler.func1 (5 handlers)
[GIN-debug] GET    /ping                     --> github.com/gonearewe/EasyTesting/handlers.PingHandler (5 handlers)
[GIN-debug] GET    /hello                    --> github.com/gonearewe/EasyTesting/handlers.HelloHandler (6 handlers)
[GIN-debug] GET    /cache                    --> github.com/gonearewe/EasyTesting/handlers.GetCacheHandler (6 handlers)
[GIN-debug] PUT    /cache                    --> github.com/gonearewe/EasyTesting/handlers.PutCacheHandler (6 handlers)
为了调试方便,可以把 stdout 和 stderr 都重定向到文件中并让程序后台运行:
$ nohup ./EasyTesting &> debug.log &
Windows 平台注意终端冻结问题
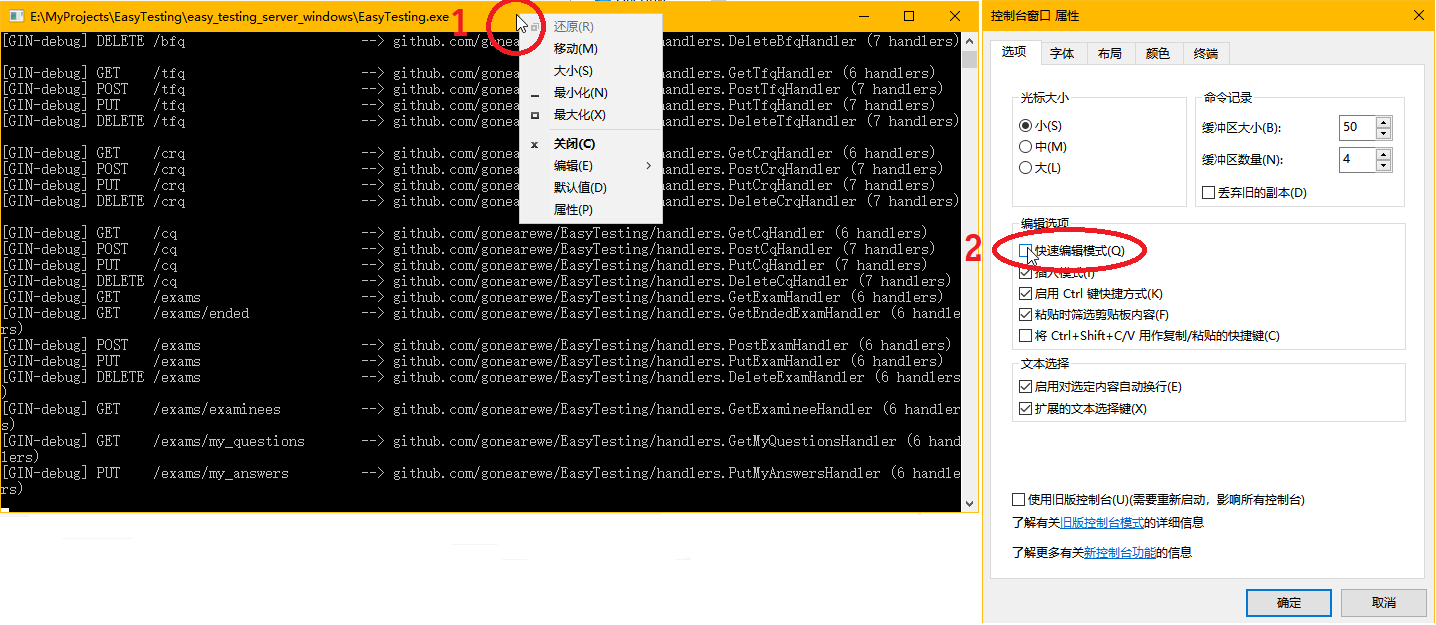
假如你在 Windows 10 平台下运行服务端,则要尤其注意:终端默认会在你点击它,同时应用程序有输出时,直接冻结程序。 通常只需要按下 Esc 或回车就能恢复程序,但倘若没有注意到这个问题,也许会导致大量的客户端连接超时 (报错:timeout of 5000ms exceeded)。
这并非是软件自身的 bug,而是 Windows 10 的问题。 详情参见 Why is my command prompt freezing on Windows 10?。 解决方法是在终端标题栏上右键,菜单选择默认值或属性(默认值会应用于所有终端),取消勾选快速编辑模式, 确定并重启终端。
现在即可在浏览器上访问 http://localhost:9000 进入教师端(如果你没有修改默认端口号的话)。 test.sql 提供的教师用户有:
| 工号 | 姓名 | 密码 |
|---|---|---|
| 0 | root | ET000 |
| 2010301800 | 张三 | Scala |
| 2012550921 | 李四 | K_On |
如果服务器在启动时出现:
Error 1292: Incorrect datetime value: '0000-00-00' for column 'end_time'
说明是 MySQL 禁用了 datetime 类型的零值。
可以通过在 MySQL console 中输入 SELECT @@GLOBAL.sql_mode; 查看
全局的 sql_mode,它可能包括这些内容:
ONLY_FULL_GROUP_BY,STRICT_TRANS_TABLES,NO_ZERO_IN_DATE,NO_ZERO_DATE,ERROR_FOR_DIVISION_BY_ZERO,NO_AUTO_CREATE_USER,NO_ENGINE_SUBSTITUTION
只需要删除其中的 NO_ZERO_IN_DATE 与 NO_ZERO_DATE,通过重新全局设置 sql_mode:
SET GLOBAL sql_mode = 'ONLY_FULL_GROUP_BY,STRICT_TRANS_TABLES,ERROR_FOR_DIVISION_BY_ZERO,NO_ENGINE_SUBSTITUTION';
参考了 Stackoverflow 上的问题 MySQL Incorrect datetime value: '0000-00-00 00:00:00'